
Tally Prime is the latest product from Tally Solution. Tally is the leading software in the field of business accounting. Tally is trusted by small as well as large businesses.
To maintain this trust, Tally enhances its software day by day and releases a new version from time to time.
But this time Tally has made major changes in their software and released it as completely new software, with the name of Tally Prime.
Table of Contents
What is Tally Prime?
Tally Prime is a business accounting software from Tally Solution, its a successor version of Tally ERP 9 release 6.6.3. It enhances the user experience with a completely new set of features.
It comes with newly refreshing A to Z interface changes, which will delight you.
“In simple words, Tally Prime is the simplest and new version of Tally ERP 9 with a new look, but power-packed with new features also.”
Should you Upgrade to Tally Prime?
Tally Prime is for professional not recommended for beginners. Because Tally just simplifies things with Tally Prime, the overall functionally is remained same.
So if you are a beginner, I suggest you learn Tally ERP 9 first, before directly jumping to Tally Prime.
If you are a professional or already a Tally ERP 9 user then Tally Prime gives you a better experience.
How to Get Tally Prime?
There are 3 ways to get Tally Prime:
- New License(Simply buy a new Tally Prime License)
- Use in Education Mode(explained below)
- Migrate you ERP 9 License into Tally Prime(explained below)
How to use Tally Prime as Education Mode?
Note: By Default, Tally Prime runs in Education mode.
- Download Tally setup files from here.
- Install it like normal software. It will not overwrite your existing Tally ERP 9 data.
- Open Tally Prime.
- Click on the 1st button, which is T: Continue In Education Mode.
- It will show a warning on the right bottom of the screen, don’t worry just press any key.
- Now it will show the company selection menu which means your Tally Prime Education Mode is ready to use.
You can also check for a detailed tutorial about Tally Prime Education mode activation.
How to Upgrade / Migrate from Tally ERP 9 to Tally Prime?
- Download and install Tally Prime first.
- Open Tally Prime and click on the 3rd button, which is R: Reactivation Existing License.
- Make sure you have a valid license.
- It will ask to restart your Tally Prime.
- After Restart it will ask for your Tally.net Id and Password.
- Now your License is successfully migrated from Tally ERP 9 to Tally Prime.
- Just for the confirmation, the Tally Prime Edu logo on the left top is changed to whatever your previous license is valid for, like for silver it will show Tally Prime Silver and for Gold, it will show Tally Prime Gold.
We already have a dedicated article about the installation, upgrade and activation of Tally Prime.
Tally Prime Features
Tally Prime is a Power Pack with new features, so here I’ll share the main features which I feel are important to share with you.
Feature 1:
Browse Feature for Company Selection
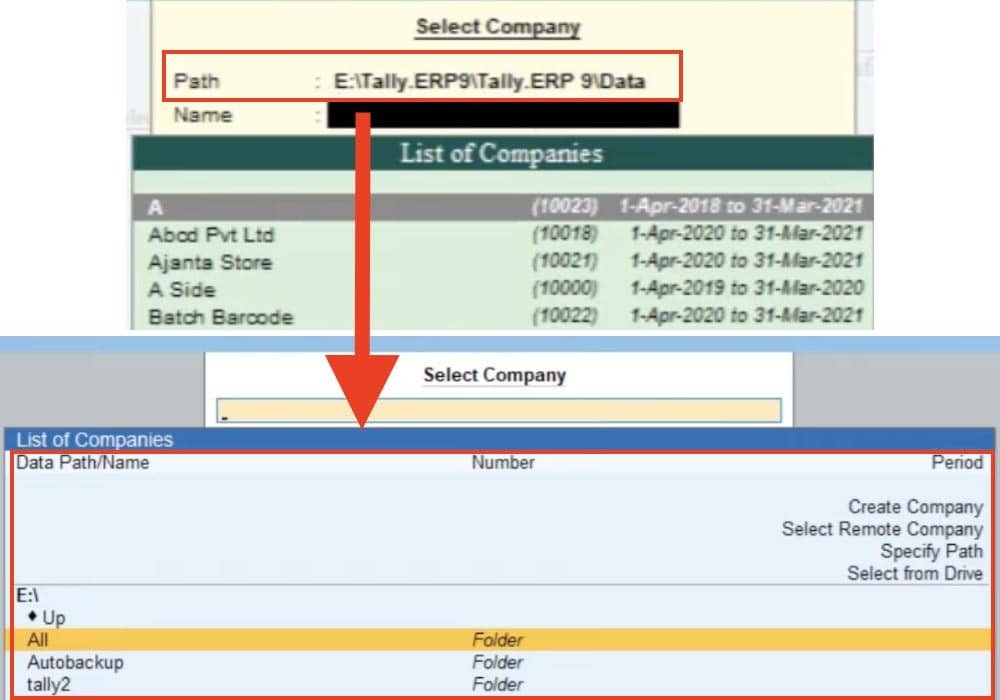
In Tally ERP 9, if you want to use company data stored on the different-different paths, then you have to change in Select Company path manually every time you want to use a company. It’s a very difficult task.
But now, Tally Prime has solved this issue with a new browse feature for company selection. This means now you have no need to change the path manually.
Just browse the company saves on any place on your computer and the path will automatically manage.
Whenever you open your Tally, it will automatically ask for the date you want to use.
Company Selection options
Here you can select the data either from your Drive, from any Specific Path or Remoter Company.
- Select from Drive: It will show all drives of your computer and you can browse any data stored on this computer from here
- Specify Path: If you the exact path of any data you can choose this option.
- Select Remote Company: Allow you to use data stored in any remote location.
Note: If you want to use Tally ERP 9 companies in Tally Prime, it will ask to migrate first, at the time of migration it will also ask to save a backup of it or not. My recommendation is to back up the complete data before upgrading to Tally Prime.
Feature 2:
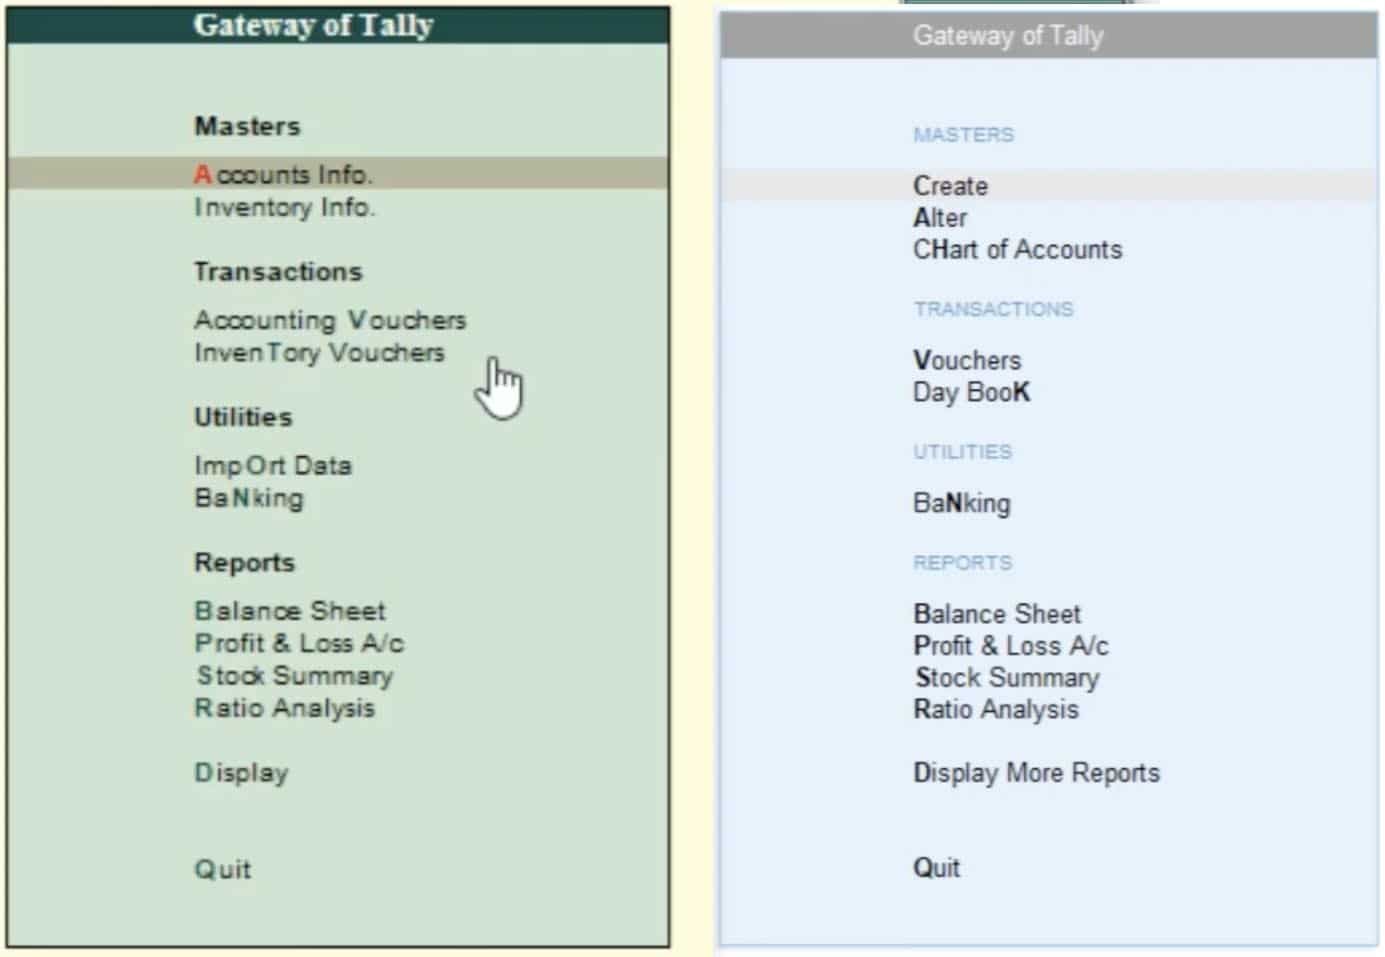
Shifted important features into Topbar menu
Tally has almost completely removed the right side vertical menu from most of the screen and introduced a new horizontal menu with commonly used features at top of every screen.
K: Company – Gateway of Tally > Company info. is a move to 1st place in the top menu.
Y: Data – All the company backup related options are moved to 2nd place in the top menu.
Z: Exchange – Gateway of Tally > Utilities > ImpOrt Data: This option is shifted to 3rd place with the name of Exchange in the top menu.
O: Import – It’s a new option that did not exist in Tally ERP 9.
E: Export – Tally has moved the previous version export option to here, this is used to export masters and transactions.
M: Email – Email is the same as ERP 9, but this time Tally puts it on the main menu.
P: Print – Same as ERP 9 with a little bit of tuneup, will discuss later.
F1: Help – Tally has move footer details of TDL, event log, repair, and migrate option here.
Feature 3:
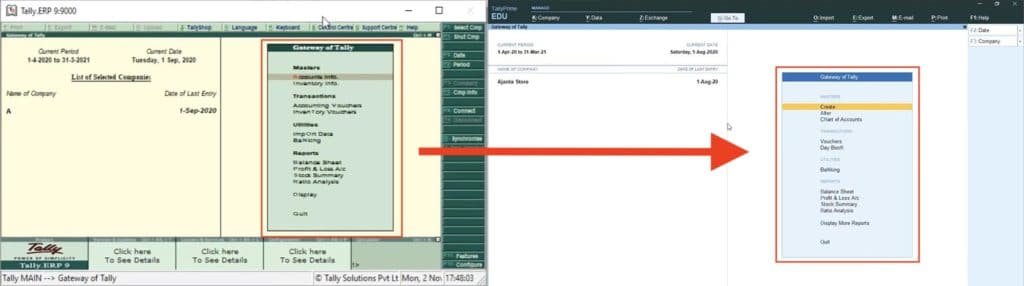
Restructure of Gateways of Tally option
Feature 4:
GoTo [Multi Tasking]
So with the help of this GoTo feature, you can open as many reports without leaving any report. You can say, all the reports can open simultaneously and you can easily switch between them without closing any previous report.
This is the best example of Multitasking.

Feature 5:
Hold Vouchers
Feature 6:
Added new options in Vouchers
Tally has introduced a few new options in the company vouchers section in the right side vertical menu bar. Like, Change Mode, More Details, Other Vouchers, etc.
If we press the Alt button on the keyboard, options become changed and the same happened with the Ctrl button also. So basically it gives you an idea about the available options for you.

Feature 7:
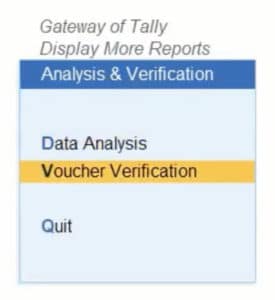
Verify or Audit Data
After clicking Analysis & Verification, you will find the Data Analysis and Voucher Verification option used for verifying data and vouchers.
Feature 8:
Reduce Pages from Printout

Feature 9:
F1 Help become more useful in Topbar menu

Feature 10:
Get all details in one place
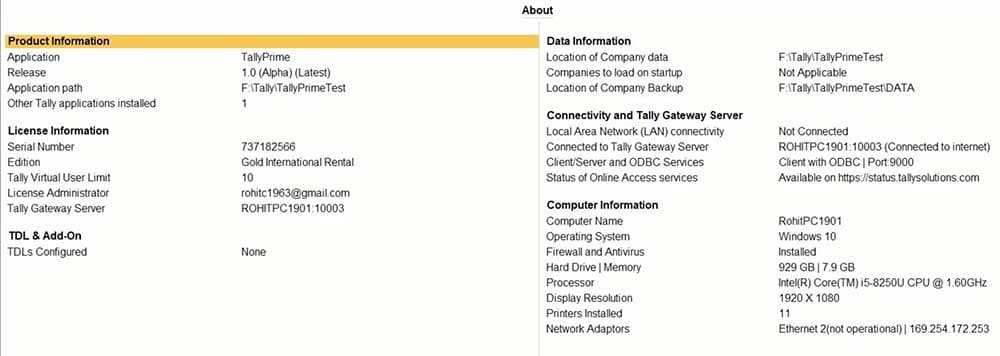
If you select Printer in Computer Information and press Shift + Enter, then it will show a complete list of installed printers on my computer.

Feature 11:
Copy-Paste Shortcut key changed
Feature 12:
Make Mouse more useable
Tally Prime comes with mouse based features also, which means you can now use the mouse as well as keyboard both simultaneously in Tally Prime.
Like in ERP 9, if you want to exit from Tally you just pressed the Esc button until you exit. But in the case of Prime, you can simply click on the cross option by mouse and it’s closed. That’s it.
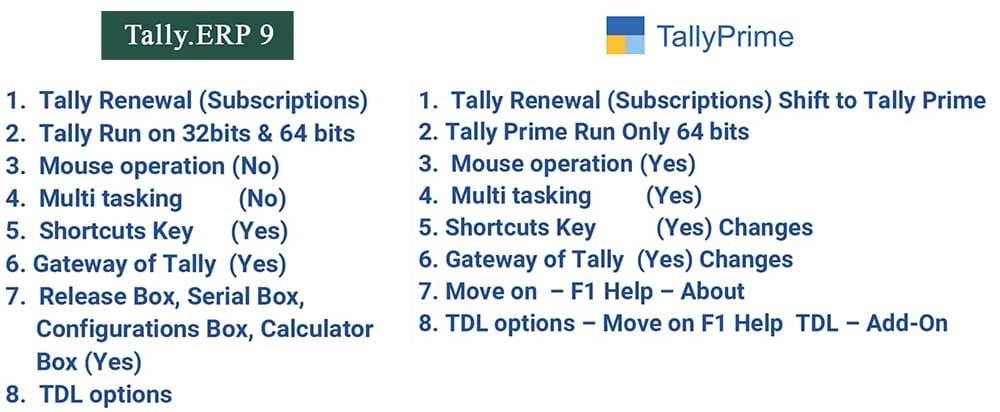
Difference from Tally ERP 9
As we all know now Tally ERP 9 is evolving with complete new branding with a fresh logo and with new features. So, today I’ll show you what Tally has changed from its previous version and how useful they are.
We will discuss all changes Point to Point, So here is the first impressive list of changes.
Difference 1: Icon changed
Tally has completely replaced its old Tally ERP 9 icon with a new icon and uses fresh colors Dark Blue, Sky Blue and Yellow color.
Difference 2: Interface changed completely
Conclusion
I have tried to share the best of my knowledge about the features of Tally Prime along with differences from the Tally ERP 9. Hope this piece of content is helpful for you. Please share your thoughts and features if I missed any in the comment box.


Thanks For Sharing Amazing and Informative Content about the Tally Prime…What about the Next Topic?????
Thanks for the appreciation.
Keep your eyes on our blog page for the next topic.
hello sir, tejashri this side working in central, i am working in tally erp9, the thing is if we do bank payment and vendor bank details are added, then can we extract data of bank payment by date and even can we fetch vendor account details in same report.. and if it is not possible in tally erp9 then can it will be possible in tally prime, hope for your reply.. i hope you got my query.
That was an in depth article on tally features. Thank you for the effort to share a good article. It is much informative.